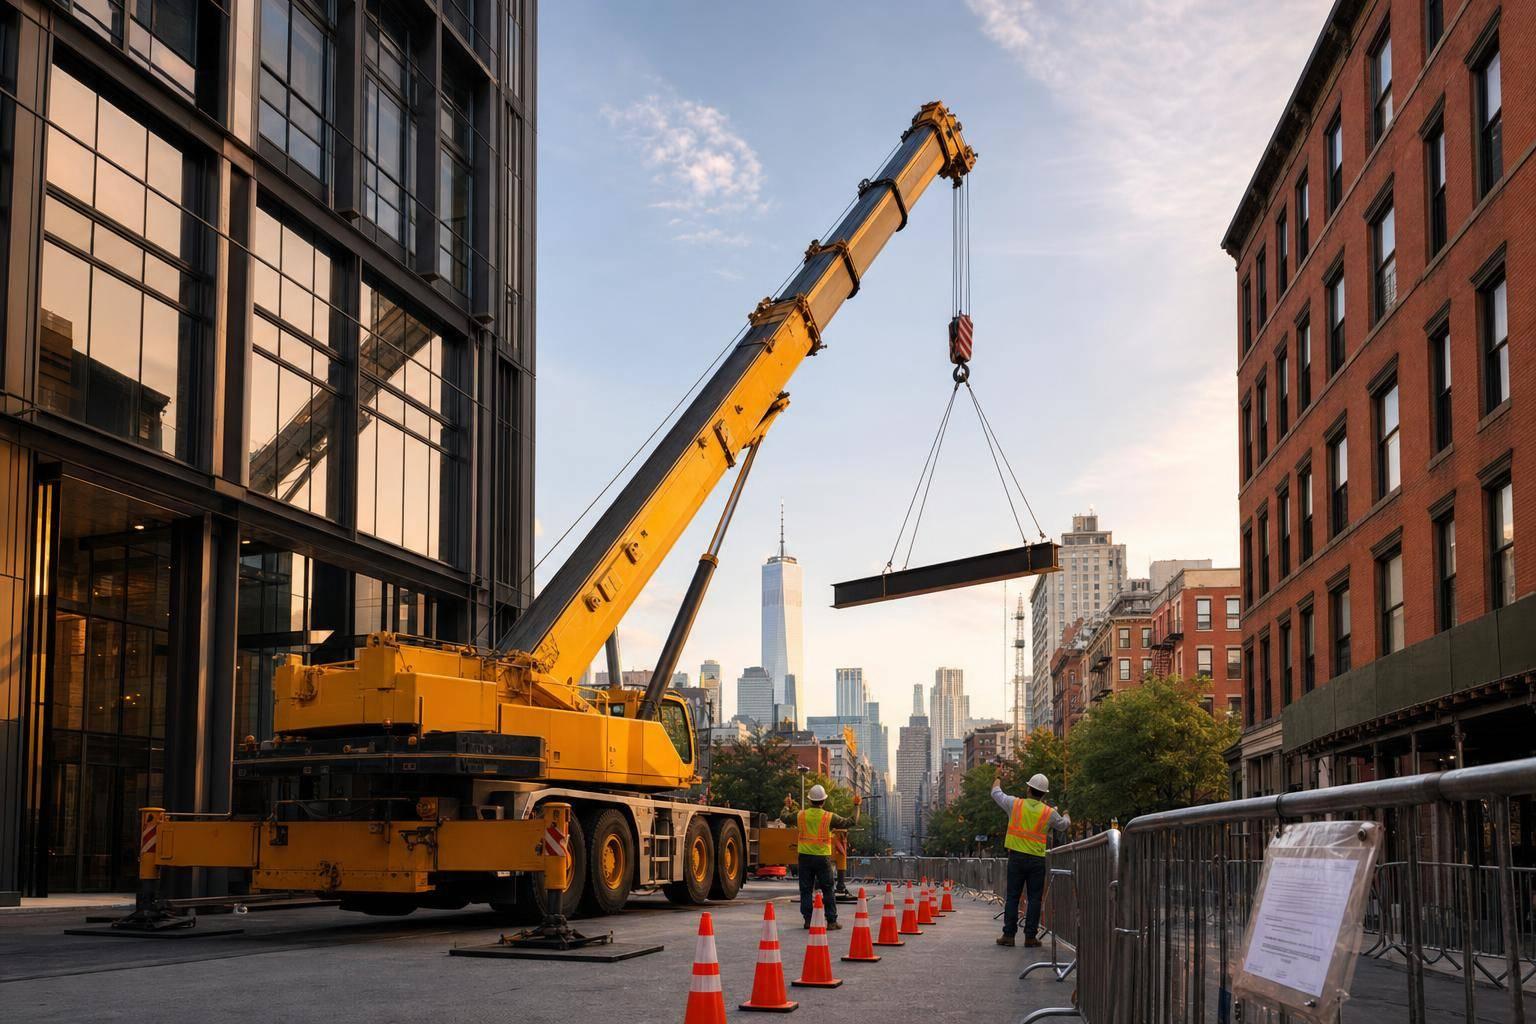
HVAC Equipment Lifting: A Step-by-Step Safety Guide

Lifting HVAC equipment is risky. 34% of HVAC injuries come from material handling mistakes, leading to back strains, falls, and even costly OSHA fines over $15,000 per violation. Here's how to lift safely and avoid accidents:
Key Safety Steps:
- Plan Ahead: Analyze load weight, site conditions, and required permits.
- Inspect Equipment: Check cranes, slings, and rigging gear for wear or damage.
- Follow Protocols: Use proper hand signals, maintain clear communication, and stick to safety zones.
Quick Facts:
- Injury claims average $42,000, with potential insurance hikes of 20-35%.
- Maintain 10 feet clearance from power lines and stop lifts if winds exceed 20 mph.
- Use spreader bars for loads over 20 feet and synthetic slings for delicate surfaces.
By sticking to these steps, you can reduce risks and ensure every lift is safe and efficient.
Crane Safety - Rigging
Planning and Risk Review
Recent studies indicate that 37% of lifting accidents are due to poor obstacle surveys. This stage tackles the essential first step highlighted earlier: thorough load and site analysis.
Weight and Load Analysis
Accurately calculating the load involves factoring in the equipment's weight, rigging hardware, and a safety margin. The formula is straightforward:
Equipment Weight + Rigging Hardware + Safety Factor = Total Load
For example, lifting a 2-ton unit requires a capacity of at least 2.5 tons to account for rigging components and safety factors.
-
Component: Rigging Slings
- Typical Weight Range: 5-15 lbs
- Notes: Per sling used
-
Component: Spreader Bars
- Typical Weight Range: 20-50 lbs
- Notes: Depends on size
Site Safety Check
Once load calculations are complete, it's crucial to assess these site-specific factors:
- Perform plate load tests (at least 1.5 times the crane outrigger pressure).
- Use ground-penetrating radar to identify voids beneath asphalt.
- For soft soil, install oak crane mats with a minimum thickness of 6 inches.
Pay special attention to overhead clearance, ensuring at least 10 feet of clearance from power lines. Establish a 360-degree exclusion zone around the lift area using barrier tape to prevent unauthorized entry.
Required Permits and Rules
The necessary permits and documentation depend on the project's location and scope. Common requirements include:
- Municipal lift permits (typically processed within 72 hours).
- OSHA-compliant lift plans.
- Verification of crane operator certifications.
- FAA Form 7460-1 for projects near airports.
For lifts exceeding 80% of the crane's capacity, a professional engineer's approval is mandatory. Additionally, teams should keep an updated list of emergency contacts, including local utility providers, readily accessible.
Equipment Selection and Checks
This step in the execution phase ensures compliance with certification verification as outlined in core safety protocols.
Crane and Rigging Selection
Using the site assessment from the planning phase, choose equipment based on these HVAC-specific needs:
-
Lift Height
- Requirement: Building height + 20ft clearance
- Key Considerations: Factor in boom angle limitations
-
Weather Rating
- Requirement: Wind speed tolerance
- Key Considerations: Reduce capacity by 15% in winds >20mph
Using synthetic slings with edge protectors can minimize surface damage by 85% when handling units with sharp edges.
Key points for selecting rigging equipment:
- Match hardware to unit design: Use non-abrasive nylon slings for coil units to avoid surface damage.
- Account for load distribution: Use spreader bars for ductwork sections longer than 20 feet.
- Ensure compatibility: Confirm all components align with manufacturer specifications.
Safety Inspection Steps
Once the equipment is selected, perform these essential pre-operation checks:
According to OSHA, qualified personnel must inspect all rigging equipment before each use, as specified in the Main Safety Steps. Follow this sequence for inspections:
1. Crane Components
- Check hydraulic systems, load indicators, outrigger stability, and boom angle sensors.
2. Rigging Hardware
- Inspect slings, hook latches, shackle pins, and edge protectors for wear or damage.
3. Documentation Review
Ensure the following documents are up to date:
- Annual certifications, operator credentials, configuration charts, and maintenance records.
For precise installations, such as rooftop units, include additional checks for boom truck stability systems and precision placement controls to ensure accuracy and safety.
Lift Operation Steps
Once permits are in place and equipment checks are complete, the lift process begins with a well-coordinated team effort.
Team Communication
A single signal person is assigned to guide the crane operator using OSHA-approved hand signals. This ensures clear and consistent communication.
-
Action: Stop
- Command: Emergency Halt
- Visual: Both arms crossed
-
Action: Hoist
- Command: Raise Load
- Visual: Finger pointing up, hand rotating
-
Action: Emergency
- Command: All Stop
- Visual: Both arms waved
To avoid miscommunication, all team members must confirm their understanding of the signals through a repeat-back process. For more complex lifts, two-way radios serve as a backup communication method.
Load Securing Methods
After communication protocols are established, the focus shifts to securing the load.
- Initial Setup: Use choker hitches with wire rope slings that match the weight of the HVAC unit being lifted.
- Pre-Lift Verification: Conduct a 6-inch test lift to confirm that the load is balanced as planned.
Lift Control Techniques
Precise control during the lift is essential and requires attention to both environmental factors and equipment operation. Wind conditions, in particular, should be reassessed during the lift.
Key controls include:
-
Control Factor: Speed Control
- Requirement: Max 2 ft/sec
- Safety Impact: Minimizes swing risk
-
Control Factor: Tag Line Position
- Requirement: 45° from load path
- Safety Impact: Improves load stability
-
Control Factor: Wind Monitoring
- Requirement: <20 mph limit
- Safety Impact: Prevents instability
-
Control Factor: Clearance Zone
- Requirement: 7 ft minimum
- Safety Impact: Avoids collisions
sbb-itb-798c36f
After-Lift Tasks
Equipment Placement
Once the lift is completed, follow these steps to properly position and stabilize the equipment:
-
Initial Positioning
- Key Action: Perform surface compression test
- Standard: Conduct ground stability checks
-
Level Verification
- Key Action: Use a digital inclinometer
- Standard: Ensure no more than 1° deviation
-
Anchoring
- Key Action: Install vibration-resistant anchors
- Standard: Follow manufacturer guidelines
-
Surface Protection
- Key Action: Add isolation materials
- Standard: Use neoprene pads for units over 500 lbs
Final Safety Check
After securing the unit, carry out these essential inspections:
- Equipment Security Verification: Use calibrated tools to check the torque on all mounting hardware. Log these readings in the lift closeout checklist for record-keeping.
- Site Cleanup Assessment: Inspect a 10-foot radius around the site with metal detectors to locate any dropped tools or hardware. This step helps minimize risks, as highlighted by the injury data in the Introduction.
-
Documentation Requirements: Ensure all required paperwork is completed, including:
- Exact location details
- Rigging equipment condition report
- Anchor torque certifications
- Final approval signature from the site supervisor [8]
For added safety, use settlement monitors to detect any potential movement issues.
"If movement exceeds 1/8 inch within 24 hours, consult a structural engineer immediately."
Difficult Lifting Situations
Weather Safety Guidelines
To ensure safety during lifting operations, follow these weather-specific thresholds:
-
Condition: Wind Speed
- Threshold: Over 15 mph
- Action: Stop operations
-
Condition: Lightning
- Threshold: Within 10 miles
- Action: Cease all work
-
Condition: Visibility
- Threshold: Less than 100 feet
- Action: Delay until conditions improve
-
Condition: Temperature
- Threshold: Below -10°F (-23°C)
- Action: Use specialized PPE
For extreme temperatures, adjust material handling:
- When temperatures exceed 100°F (38°C), limit exposure of aluminum components to 2 hours.
- Use UV-protective wraps to shield rubber insulation.
Professional Help Requirements
Certain site conditions demand the involvement of certified professionals. These include:
- Dual-Crane Operations: Required for loads exceeding 75% of the crane's rated capacity.
-
Proximity to Power Lines: Lifts within 20 feet of power lines require expert oversight, which includes:
- Voltage assessments
- Arranging line de-energization
- Use of specialized insulation equipment
-
Complex Site Conditions: Professional assistance is necessary in scenarios such as:
- Limited workspace
- Preservation of historic structures
- Operations in active facilities like hospitals
Documentation Needed for Professional Services:
- Advanced rigging certification
- Recent inspection reports for equipment
- Liability insurance of at least $2M
- Engineer-approved site plan
These situations should follow the certification verification process outlined in the Main Safety Steps protocol.
Summary
Process Overview
Lifting HVAC equipment involves a three-phase process, as described earlier:
-
Pre-Planning
- Key Actions: Load calculation, site review
- Safety Priorities: Confirm manufacturer specs, check clearances
-
Equipment Setup
- Key Actions: Position crane, inspect rigging
- Safety Priorities: Ensure outrigger stability, test sling angles
-
Execution
- Key Actions: Control load, maintain communication
- Safety Priorities: Use hand signals, apply tag lines
-
Verification
- Key Actions: Place equipment, document work
- Safety Priorities: Verify alignment, complete inspection forms
Safety Checklist
Stick to this safety checklist to ensure every lift is performed securely and efficiently:
Load Assessment
- Determine the total weight using manufacturer specs.
- Factor in wind-related forces.
- Ensure the crane's capacity matches the load requirements.
Equipment Inspection
- Use a color-coded tag system to inspect rigging gear.
- Perform monthly non-destructive tests on wire ropes.
Site Safety
- Maintain a 10-foot clearance from power lines, using insulated tag lines.
- Monitor wind speeds and stop operations if winds exceed 25 mph.
- Confirm stable ground conditions for outrigger setup.
Communication
- Follow standardized hand signals as outlined by MCAA guidelines.
By following these steps, you can reduce the risk of accidents and equipment failures.
"Always cross-verify load weights using both equipment manuals and on-site measurements" - MCAA Rule #1
FAQs
What are the basic rigging equipment?
When lifting HVAC components, having the right rigging equipment is essential. Each tool serves a specific purpose, ensuring safety and efficiency during operations.
- Wire Rope Slings - For standard lifting needs (3/8"-1" diameter)
- Synthetic Slings - Protect delicate surfaces
- Steel Chains - Handle heavy compressors (Grade 100)
- Spreader Beams - Distribute loads evenly
- C-hooks - Ideal for coil handling
For handling glass-reinforced units, vacuum lifters are the safest option. Lifting frames are recommended for variable refrigerant flow systems to maintain stability during hoisting.
Key Safety Tips:
- Always use hooks with safety latches when securing loads.
- Protect sling edges appropriately to prevent damage.
- Adhere to the load ratings specified by the manufacturer.
For detailed inspection procedures, check the Safety Checklist in Section 7.
Related posts
Related Articles
Top Tips for Renting a Crane in New York City for Your Construction Needs
Essential steps for renting a crane in NYC: choose the right crane, secure permits, plan lifts, verify crew, and compare total costs.
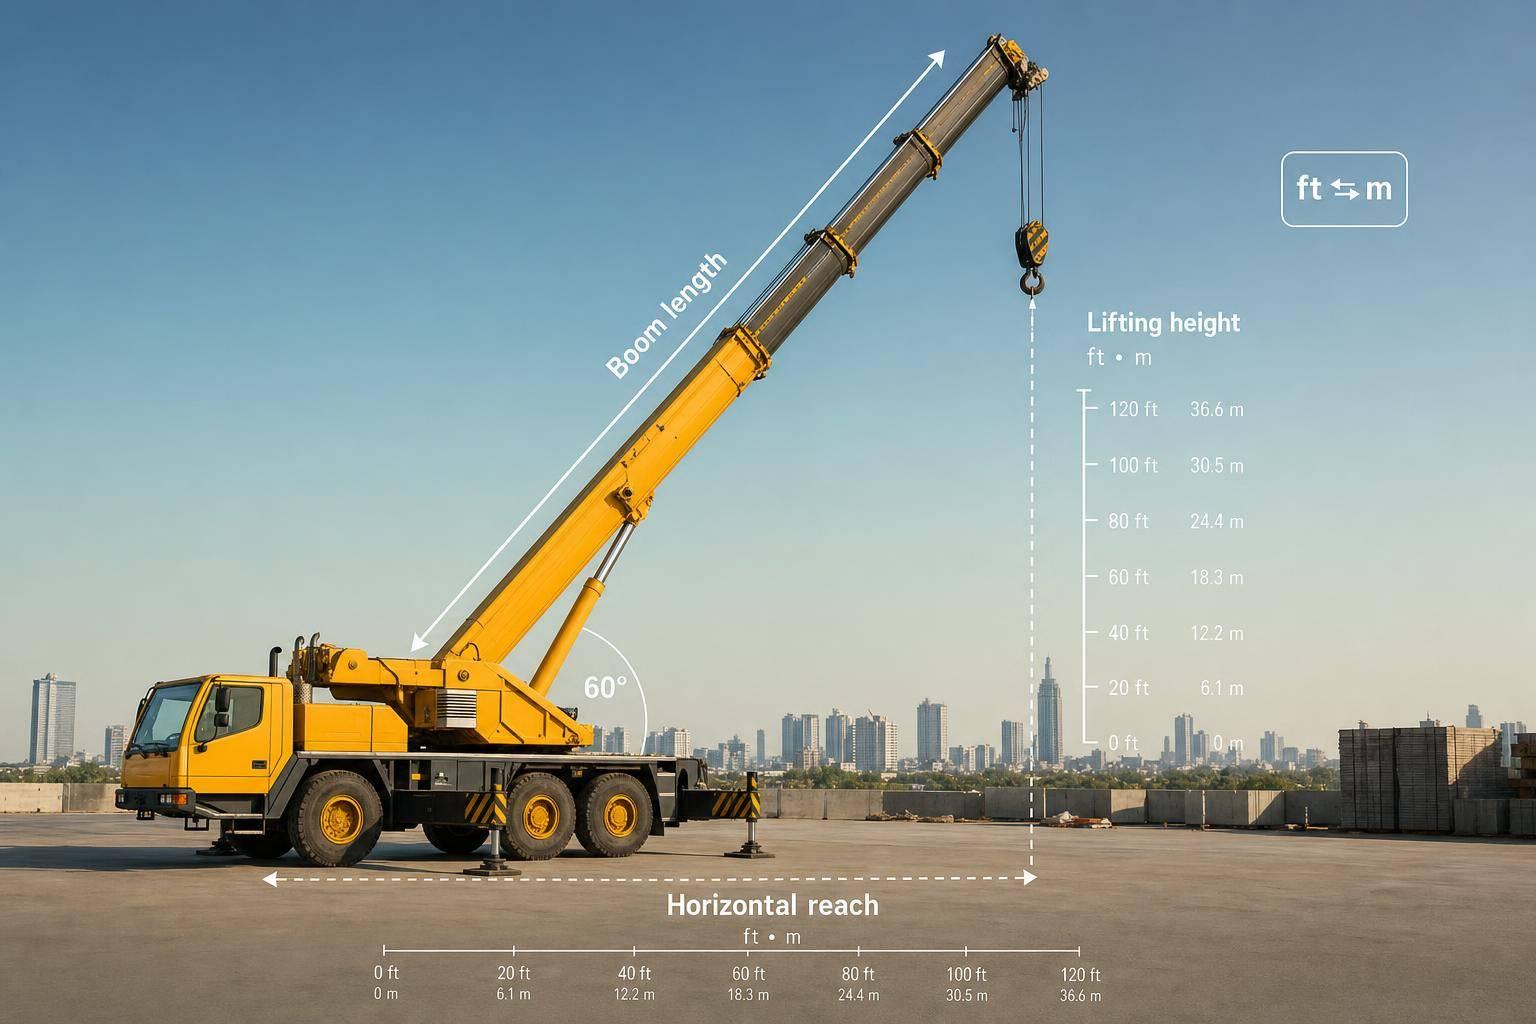
Lifting Height and Distance Converter
Calculate crane lifting height and horizontal reach from boom length and angle. Switch between feet and meters in seconds.
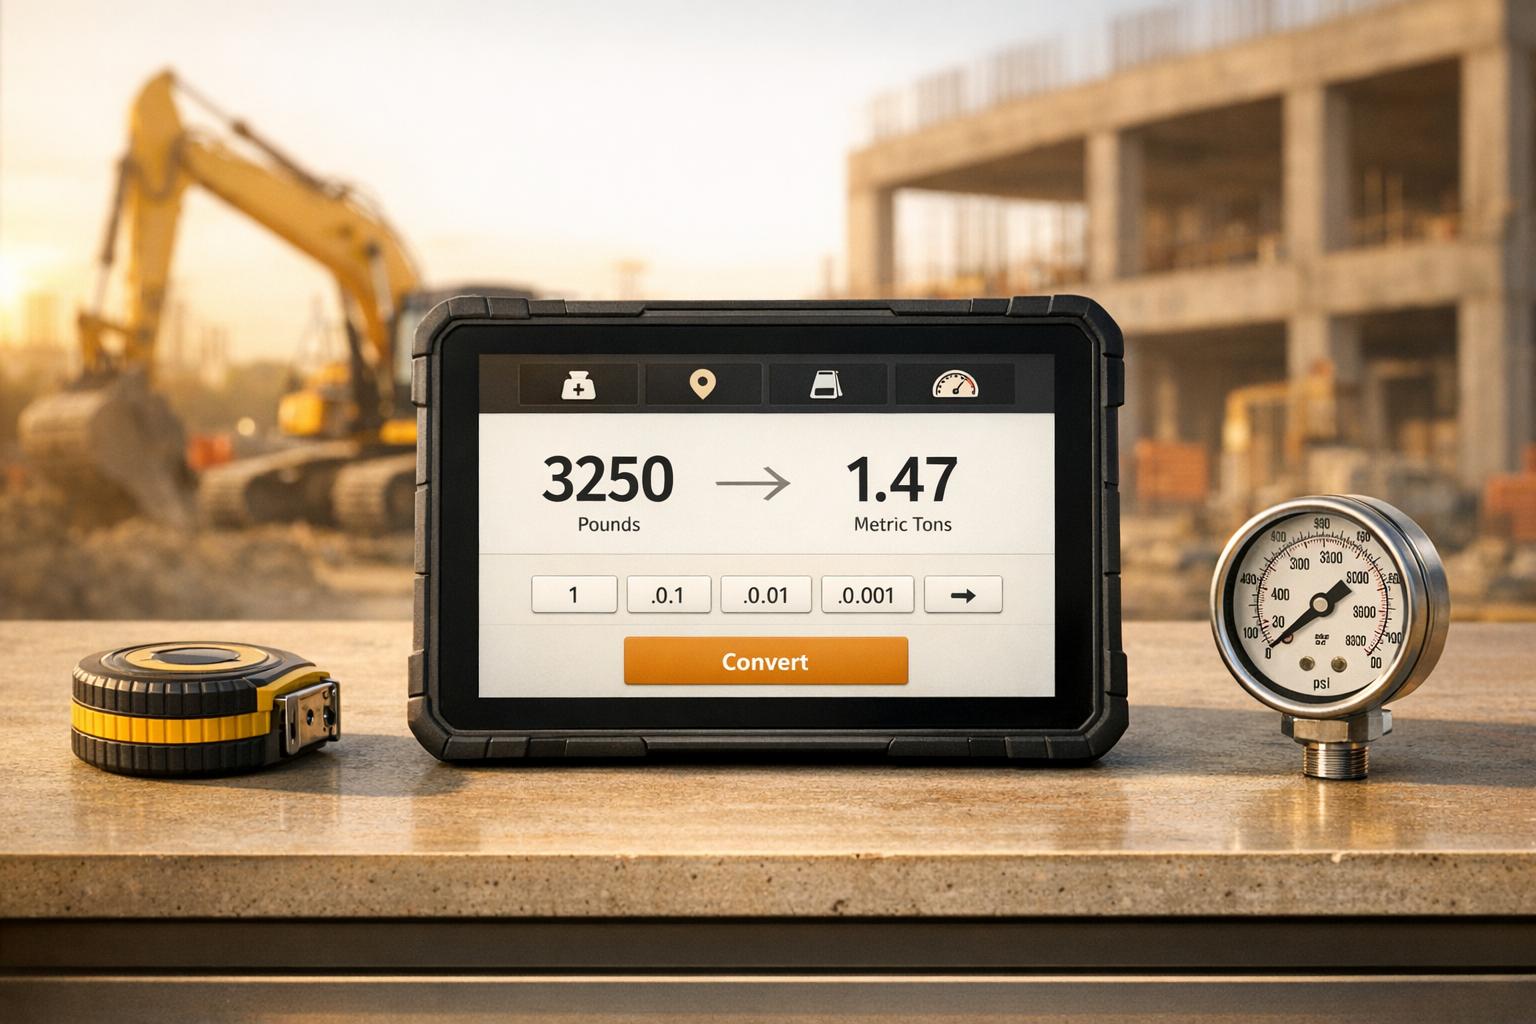
Heavy Equipment Unit Converter
Convert weight, distance, volume, and pressure units fast for construction and engineering jobs, with clear results and easy rounding options.