Top 6 Rigging Techniques for Heavy Equipment

Rigging is essential for safely handling heavy equipment in industries like construction and transportation. Here’s a quick guide to the top 6 rigging techniques and their uses:
- Single-Part Line: Ideal for quick, simple lifts of lighter loads.
- Two-Part Line: Doubles lifting capacity, perfect for heavier loads requiring precision.
- Basket Hitch: Best for stable, evenly distributed loads like HVAC units or construction materials.
- Choker Hitch: Securely grips items like pipes or logs but loses capacity as angles decrease.
- Bridle Sling: Handles multi-point lifts, distributing weight evenly for stability.
Why It Matters: Proper rigging prevents accidents, extends equipment lifespan, and ensures compliance with OSHA safety standards. Following these methods, combined with certifications like NCCCO Rigger Levels I and II, can create a safer workplace.
Quick Comparison of Rigging Techniques
-
Single-Part Line
- Best For: Simple vertical lifts
- Key Benefit: Easy to set up, precise control
-
Two-Part Line
- Best For: Heavier loads
- Key Benefit: Increased lifting capacity
-
Basket Hitch
- Best For: Wide or bulky items
- Key Benefit: Excellent load stability
-
Choker Hitch
- Best For: Cylindrical objects
- Key Benefit: Prevents slipping
-
Bridle Sling
- Best For: Multi-point lifting tasks
- Key Benefit: Even weight distribution
Safety Tip: Always inspect equipment, check load capacity, and use proper communication signals to prevent accidents during lifts.
Rigging Basics 101
1. Single-Part Line Method
The single-part line method is one of the easiest and most commonly used rigging techniques.
When to Use Single-Part Lines
This method works well for lifting lighter loads quickly and efficiently. It's best suited for situations where:
-
Load Characteristics: Weight Range
- Ideal Conditions: Falls within the crane's direct lift capacity
-
Load Characteristics: Load Stability
- Ideal Conditions: Items are naturally balanced
-
Load Characteristics: Access Requirements
- Ideal Conditions: Clear, unobstructed vertical lift path
-
Load Characteristics: Time Constraints
- Ideal Conditions: Fast turnaround is needed
If these conditions are met, you're ready to move on to the setup process.
Setting Up Single-Part Lines
Proper setup is crucial for both safety and efficiency. Here's a step-by-step guide:
-
Initial Assessment
Confirm the load's weight is within the crane's capacity. Inspect the load and all related equipment for any signs of wear or damage. -
Equipment Preparation
Ensure the lifting device, rigging hardware, and load protection materials are rated appropriately for the load being handled. -
Implementation
Attach the sling securely to the load, then connect it to the hook. Apply a light strain to confirm that all safety devices and load protections are functioning properly.
Strengths and Limitations
The single-part line method has its pros and cons:
-
Aspect: Advantages
- Details: Quick to set up, requires minimal equipment, and offers direct load control
-
Aspect: Weight Capacity
- Details: Best for lighter loads
-
Aspect: Efficiency
- Details: Ideal for simple, straightforward lifting tasks
-
Aspect: Limitations
- Details: Limited mechanical advantage and not suitable for complex load distributions
For better control during lifts, consider using a tagline or tether to manage the load's movement. If greater mechanical advantage is required, you may need to switch to a more advanced system. For instance, while a 2:1 system is good for light loads, a 4:1 system can handle moderate weights more effectively.
2. Two-Part Line Method
Understanding Two-Part Lines
The two-part line method expands on single-part systems by providing better load control and increased lifting capacity. This setup involves routing a single wire rope over the drum and splitting it into two parts, effectively doubling the system's lifting capability. It's a practical choice for heavy lifts that demand precision while keeping the simplicity of single-part systems intact.
Steps to Set Up a Two-Part Line
Here’s how to set up a two-part line system:
-
Equipment Inspection
Carefully examine all components - such as wire ropes, drums, blocks, and pulleys - for any wear or damage. Make sure identification markings are clear and display accurate safe working loads. -
System Configuration
Properly route the wire rope through the drum and pulley system, ensuring it is reeved into two parts. This arrangement is what allows the system to achieve its doubled lifting capacity. -
Safety Check
Verify that the load is within the system's increased capacity. Use hooks with self-closing safety latches, secure taglines or guide ropes, and ensure clear communication among team members before beginning the lift.
Once the setup is complete, you can evaluate how this method performs compared to single-part systems.
Comparing Single and Two-Part Lines
Single-part and two-part line systems serve different purposes. Single-part systems, using just one rope, allow for faster lift speeds. On the other hand, two-part systems offer twice the lifting capacity and better precision by distributing the load more evenly. While two-part systems may operate at slower speeds, they provide more controlled and accurate lifts, which is especially important when handling delicate or high-value equipment.
sbb-itb-798c36f
3. Basket Hitch Method
Basket Hitch Uses
The basket hitch is a rigging technique designed for lifting loads with even weight distribution. It uses a flat webbing sling, creating a cradle-like support with two loops. This method is ideal for lifting items like large HVAC units, evenly distributed construction materials, cylindrical equipment, or rectangular containers with a stable center of gravity.
When the sling legs are positioned at a 90° angle and a D/d ratio of 25:1 is maintained, the basket hitch can handle up to twice the capacity of a single-leg vertical hitch. This makes it a go-to method when load stability is critical.
Basket Hitch Setup Guide
To set up a basket hitch properly, follow these steps:
-
Choose the Right Equipment
Use flat webbing slings rated for the load. -
Position the Sling
Place the sling under the load, ensuring equal leg lengths and avoiding twists. -
Select a Configuration
Depending on the load, choose one of these options:- Standard Basket: A single wrap around the load.
- Double Wrap: Two wraps for better grip on smooth surfaces.
- Double Basket: Two separate slings for improved load balance.
Once configured, check that the load is balanced and stable.
Load Balance and Safety
After setup, confirming load balance is crucial. The basket hitch evenly distributes the load across four straps, providing excellent stability during lifts. To ensure safety:
- Monitor Sling Angles: A sling angle less than 90° reduces lifting capacity.
- Assess the Load: Avoid using this method for unbalanced or hard-to-stabilize loads.
- Use Multiple Slings if Needed: For complex loads, additional slings may help maintain control.
An adjustable version of the basket hitch is available, allowing riggers to modify sling leg lengths to level uneven loads.
4. Choker Hitch Method
Best Uses for Choker Hitches
Choker hitches are ideal for lifting single items such as pipes, logs, or structural steel. They work by tightening securely around the load. When the angle is between 120° and 180°, the hitch retains its full lifting capacity (100%). However, as the angle decreases, so does the capacity. For angles below 29°, the capacity drops to 49%.
-
Angle Range: 120° - 180°
- Capacity: 100%
-
Angle Range: 90° - 120°
- Capacity: 87%
-
Angle Range: 60° - 89°
- Capacity: 74%
-
Angle Range: 30° - 59°
- Capacity: 62%
-
Angle Range: 0° - 29°
- Capacity: 49%
Now that you know where choker hitches shine, here's how to set one up.
Choker Hitch Setup Steps
To set up a choker hitch, follow these steps:
- Initial Positioning: Place the sling around the load, ensuring the choke point touches only the sling body.
- Securing the Choke: Thread one sling eye through the other and attach it to the crane hook. For extra grip, use a double wrap.
- Pre-lift Preparation: Tighten the choke completely before lifting, and align the crane directly above the load's center.
Comparing Hitch Types
After setting up, it’s helpful to compare the choker hitch to other hitch types to determine the best fit for your task. The choker hitch stands out for its secure grip. Here are some key points about its capacity:
- Wire rope choker hitches operate at 75% of a straight leg vertical hitch's capacity.
- Synthetic choker hitches can maintain up to 80% of a vertical hitch's Work Load Limit.
- Double wrap chokers offer improved load compression.
For loads that are unbalanced or consist of loose bundles, other methods, such as the basket hitch, might be more suitable. If you need to turn a load, use doubled chokers with both sling eyes positioned on top, facing opposite the turn direction.
These comparisons help clarify when to use a choker hitch and when another method might be better.
5. Bridle Sling Method
Bridle Sling Applications
The bridle sling is a dependable option for multi-point lifting tasks, especially when dealing with loads that have fixed lifting points or uneven weight distribution. It works by spreading forces evenly across multiple sling legs. Common uses include:
- Lifting heavy machinery with lifting lugs
- Orienting structural beams precisely
- Handling equipment with several attachment points
- Managing loads with varying weight
Bridle Sling Setup Guide
1. Pre-lift Assessment
Evaluate the total load weight, locate lifting points, and identify the center of gravity.
2. Component Selection
Choose the right sling material based on your application:
-
Nylon Web
- Best For: Sensitive equipment
- Features: Lightweight, easy to handle
-
Wire Rope
- Best For: Regular heavy loads
- Features: Strong, resists fatigue
-
Chain
- Best For: Hot materials
- Features: Heat-resistant, highly durable
3. Configuration Setup
Ensure all sling legs are the same length and connected on the same horizontal plane for proper load balance.
Multi-Point Lifting Advantages
Bridle slings excel in load control by evenly distributing weight and allowing adjustments for unbalanced loads. Some key advantages include:
- Even weight distribution across multiple points
- Improved load stability
- Precise control over load orientation
- Longer sling lifespan through rotating bearing points
- Greater lifting capacity compared to double-leg assemblies
However, sling angles can significantly affect force distribution, increasing stress on slings and rigging hardware. Always check rigging charts to confirm safe working angles before lifting. This method is an essential part of safe practices for handling heavy equipment.
Conclusion
This guide outlines essential techniques for lifting heavy equipment safely and effectively.
Overview of Rigging Techniques
Here’s a quick breakdown of five common rigging methods, their uses, and what they bring to the table:
-
Single-Part Line
- Applications: Simple vertical lifts
- Benefits: Easy to set up, precise control
-
Two-Part Line
- Applications: Heavier loads
- Benefits: Better mechanical advantage
-
Basket Hitch
- Applications: Wide or bulky items
- Benefits: Great for keeping loads stable
-
Choker Hitch
- Applications: Cylindrical objects
- Benefits: Helps prevent slipping
-
Bridle Sling
- Applications: Multi-point lifting
- Benefits: Ensures even weight distribution
These techniques are essential for handling loads safely and efficiently, blending practical skills with required qualifications.
Certifications You’ll Need
While OSHA doesn’t require formal certification, having the right credentials is critical. The National Commission for the Certification of Crane Operators (NCCCO) provides two key certifications:
Rigger Level I Certification
Covers basic rigging tasks and routine lifting operations.
Rigger Level II Certification
Designed for more advanced rigging, including complex lifts and independent decision-making.
Combining these certifications with proper techniques and safety measures ensures a safer work environment.
Essential Safety Practices
Crane-related accidents claim over 20 lives annually in the U.S., often due to improper rigging. Following these safety steps can help prevent accidents:
Before the Lift
- Inspect all equipment thoroughly.
- Confirm the rigging capacity matches the load weight.
- Check identification markings.
- Adhere to OSHA’s distancing rules.
During the Lift
- Perform a test lift to ensure everything is secure.
- Use correct hand signals for communication.
- Keep the area around the lift clear.
After the Lift
- Remove damaged equipment from use immediately.
- Store rigging gear in the right conditions.
- Stay within recommended load limits.
- Maintain proper documentation for inspections.
Related posts
Related Articles
Top Tips for Renting a Crane in New York City for Your Construction Needs
Essential steps for renting a crane in NYC: choose the right crane, secure permits, plan lifts, verify crew, and compare total costs.
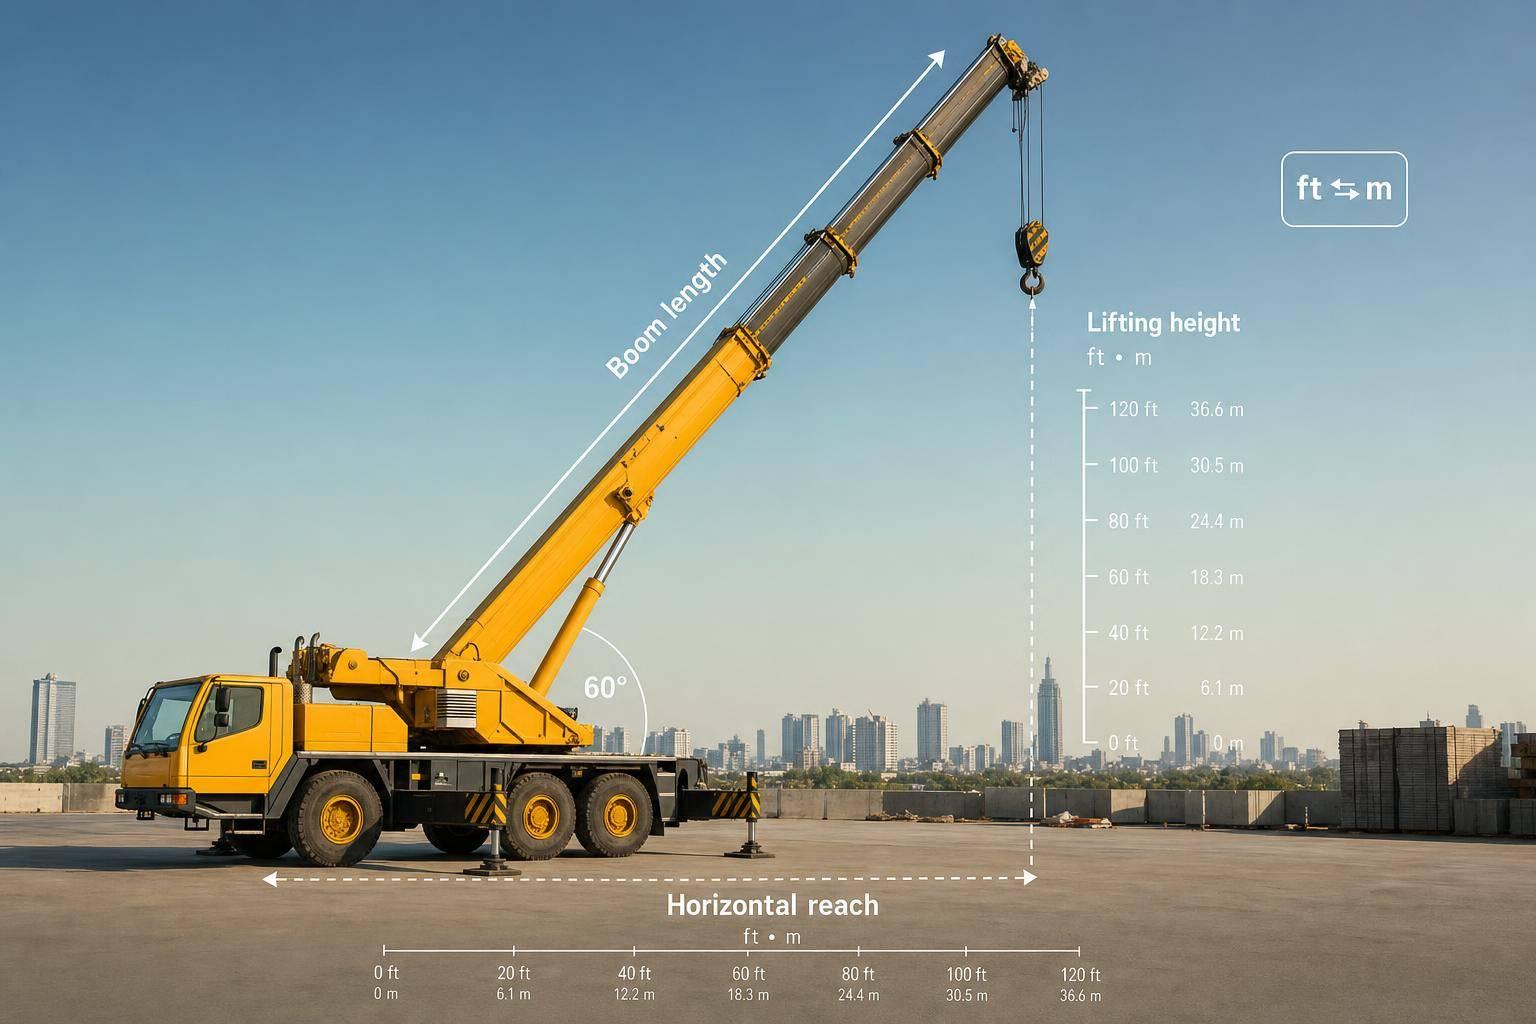
Lifting Height and Distance Converter
Calculate crane lifting height and horizontal reach from boom length and angle. Switch between feet and meters in seconds.

Heavy Equipment Unit Converter
Convert weight, distance, volume, and pressure units fast for construction and engineering jobs, with clear results and easy rounding options.